URDF models of PR2 are stored in pr2_description package, including the following files:
urdfdirectory: definition of PR2 and parts of PR2.- parts directory: for example, there are three files in directory
base_v0base.urdf.xacro: definesxacromacros for joints and links, including dynamics params, inertial params, etc.base.transmission.xacro: definesxacromacros for transmissions between Actuators and Joints, including the name of the actuator and the joint, and the "mechanical reduction" param which will be used in forward and backward propagation.base.gazebo.xacro: defines gazebo-related parameters and gazebo plugins (most from the gazebo_plugins repository).
common.xacro: parameters of robot parts.
- parts directory: for example, there are three files in directory
robotsdirectory: urdf files which expands thexacromacros above for detailed definition of robot parts.pr2.urdf.xacro: full pr2 robotpr2_no_arms.urdf.xacro: pr2 robot without arms and gripperspr2_no_kinect.urdf.xacro: pr2 robot without front kinect sensor (sensor_mount)pr2_se.urdf.xacro: pr2 robot with only one arm
gazebodirectory: specifies which plugins will be loaded into ros.gazebo_ros_controller_manager: main control plugin of pr2 gazebo simulator.
TheupdateRateparameter specifies maximum update rate ofgazebo_ros_controller_manager.``````gazebo_ros_power_monitor_controller: power monitor in gazebo; useless for porting to UE4.
In PR2, there are two kinds of Joints connecting robot links: rotational joints (most) and translational joints (torso and gripper).
Joints are defined in pr2_mechanism_model/include/joint.h, having three read-only variables and one write-to variable:
- joint position (read-only, in radian or metres)
- joint velocity (read-only, in rad/s or m/s)
- joint efforts (measured, in Nm or N)
- command efforts (which will be converted to actuator efforts, in Nm or N)
TODO: Joint States
Actuators are motors of the robot, in real PR2 robots, actuators are connected with EtherCAT libraries to set currents for motors to control PR2 directly.
Actuators are defined in pr2_hardware_interface/include/hardware_interface.h, including an ActuatorState struct and an
ActuatorCommand struct. ActuatorState contains actuator's position, velocity and previous effort (or current), and
ActuatorCommand struct contains the effort to apply.
A transmission is an element in your control pipeline that transforms efforts/flow variables such that their product -- power -- remains constant. It is used to describe the relationship between an actuator and a joint. A transmission interface implementation maps effort/flow variables to output effort/flow variables while preserving power.
Transmissions are defined in pr2_mechanism_model/include/pr2_mechanism_model/transmission.h, including forward
propagation (actuator effort -> joint effort, joint position -> actuator position) and backward propagation (joint
effort -> actuator effort, actuator position -> joint position). The transmission finds finds the actuator and joint by
their names.
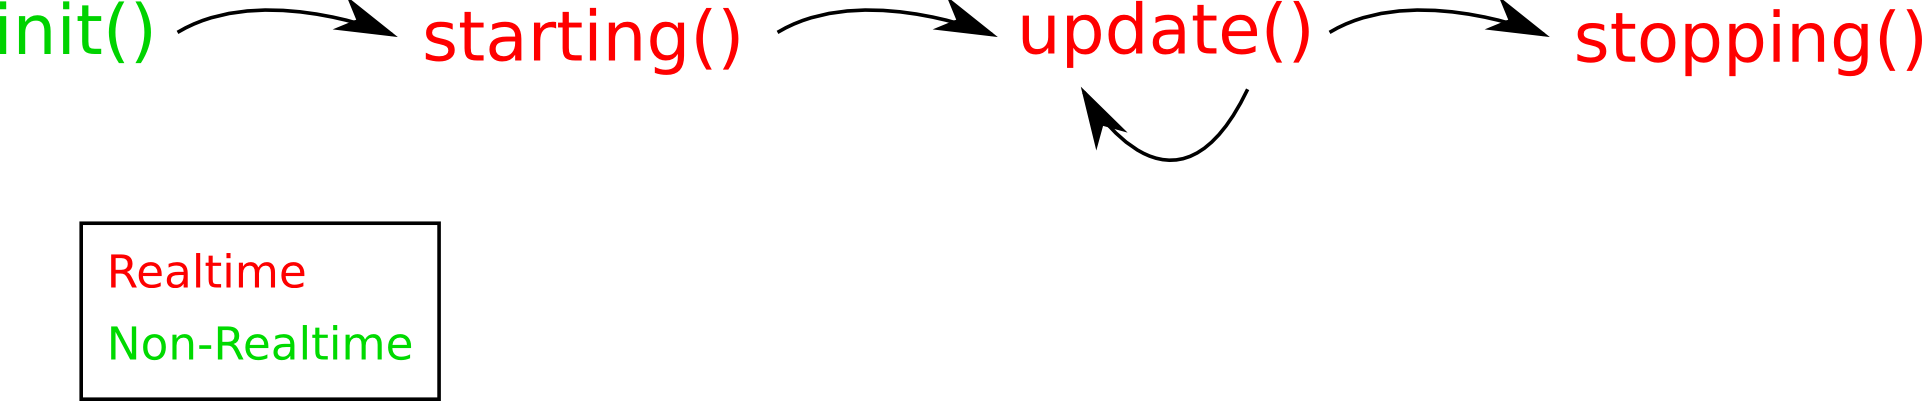
The PR2 controller interface is defined in pr2_controller_interface/controller.h, which defines init(),
starting(), update(), stopping() functions. The image below gives the flowchart that shows in what order
these four methods are called.
Controllers only read / write to the joint state of specific joints defined in the robot model.
Most controllers used in PR2 are general robot mechanism controllers (defined in robot_mechanism_controllers package), but some of the controllers (like the base controller, the caster controller and the gripper controller) are PR2 specific, defined in pr2_mechanism_controllers package.
Properties of all the controllers that will be used in gazebo simulator is in the pr2_controller_configuration_gazebo package. Four types of controllers (mentioned below) are used in PR2 simulation.
- Joint Effort Controller
- Sets the effort which will be added to the joint directly.
- Used in these controllers:
torso_lift_effort_controllerr_shoulder_pan_effort_controllerr_shoulder_lift_effort_controllerr_upper_arm_roll_effort_controllerr_elbow_flex_effort_controllerr_forearm_roll_effort_controllerr_wrist_flex_effort_controllerr_wrist_roll_effort_controllerl_shoulder_pan_effort_controllerl_shoulder_lift_effort_controllerl_upper_arm_roll_effort_controllerl_elbow_flex_effort_controllerl_forearm_roll_effort_controllerl_wrist_flex_effort_controllerl_wrist_roll_effort_controllerr_gripper_effort_controllerl_gripper_effort_controller
- Joint Velocity Controller
- Uses PID Controller to compute desired efforts to control the joint from current velocity to target velocity.
- Updates in every simulation tick (1ms).
- Used in these controllers:
torso_lift_velocity_controllerr_shoulder_pan_velocity_controllerr_shoulder_lift_velocity_controllerr_upper_arm_roll_velocity_controllerr_elbow_flex_velocity_controllerr_forearm_roll_velocity_controllerr_wrist_flex_velocity_controllerr_wrist_roll_velocity_controllerl_shoulder_pan_velocity_controllerl_shoulder_lift_velocity_controllerl_upper_arm_roll_velocity_controllerl_elbow_flex_velocity_controllerl_forearm_roll_velocity_controllerl_wrist_flex_velocity_controllerl_wrist_roll_velocity_controller
- Joint Position Controller
- Uses PID Controller to compute desired efforts to control the joint from current position to target position using position and velocity information.
- Updates in every simulation tick (1ms).
- Used in these controllers:
torso_lift_position_controllerr_shoulder_pan_position_controllerr_shoulder_lift_position_controllerr_upper_arm_roll_position_controllerr_elbow_flex_position_controllerr_forearm_roll_position_controllerr_wrist_flex_position_controllerr_wrist_roll_position_controllerr_gripper_position_controllerl_shoulder_pan_position_controllerl_shoulder_lift_position_controllerl_upper_arm_roll_position_controllerl_elbow_flex_position_controllerl_forearm_roll_position_controllerl_wrist_flex_position_controllerl_wrist_roll_position_controllerl_gripper_position_controller
- Joint Trajectory Controller
- To control joints using trajectories or goals, we need
joint_trajectorybased controller. It consists an action node and a controller node.- The action node exposes an action interface to a joint trajectory controller and provides an action server (see actionlib) that takes in goals of the type pr2_controllers_msgs/JointTrajectoryGoal. It subscribes
goaltopic and updates the goal for the controller node. - The controller node
JointTrajectoryActionControllerin packagerobot_mechanism_controllers. It executes joint-space trajectories on a set of joints. It takes, as a command, a message specifying the desired position and velocity of each joint at every point in time, and executes this command as well as the mechanism allows.
- The action node exposes an action interface to a joint trajectory controller and provides an action server (see actionlib) that takes in goals of the type pr2_controllers_msgs/JointTrajectoryGoal. It subscribes
- For PR2 arm controllers (
r_arm_controllerandl_arm_controller), we usejoint_trajectory_actionto send trajectory message and useJointTrajectoryActionControllerto plan movement for joints in shoulders, wrists, elbows and arms. - For PR2 head controllers (
head_traj_controller), we usepr2_head_actionto set trajectory and useJointTrajectoryActionControllerto plan movement for joints.
- To control joints using trajectories or goals, we need
- Calibration Controllers (defined in
pr2_calibration_controllers) should only be used in calibration process of real PR2 robots. In PR2 simulation there is no calibration process (we just set the/calibratedtopic to true) so we do not need them.
The PR2 also has several pr2-specific controllers to control its parts, like the Pr2BaseController and Pr2GripperController.
- The
Pr2BaseControllersubscribes<name>/commandingeometry_msgs/Twist(including linear and angular velocity) to get velocity commands for the base, controls wheels and casters using the velocity controllers, and sendBaseControllerState(including command, joint velocity and joint effort) to the state topic. - The
Pr2GripperControllersubscribescommandinPr2GripperCommandformat (including position and maximum effort). Thegripper_actionnode sets the goal and thePr2GripperControllertries to approach to the goal.
To manage all the controllers, PR2 uses a ControllerManager class in pr2_controller_manager package to store and control all the controllers used in the robot.
- The controller manager is connected to the robot model (including joint states and transmissions) and the hardware interface (including actuators) using pointers.
- In the controller manager initialization process, it reads all controller information from xml and yaml files specified in the urdf file, and try to load all the controllers and connect them to corresponding joints, transmissions and actuators for future update.
- In
updatefunction, it:- first propagate (forward) actuator positions to joint positions (including position, velocity and measured effort)
- then update the controller to set the "effort" property in joint states
- finally propagate (forward) joint efforts to the actuator.
In order to add or remove controllers on-line, the controller manager provides with several services to add / remove / run / stop specified controllers. The pr2_controller_manager script is used to manage the controllers. The spawner script, which is used in pr2 simulator, is used to run new controllers using parameters from yaml files.
The gazebo pr2 simulation stack (in pr2_gazebo package) contains a lot of launch files to launch different parts of the pr2 simulator.
-
The world. Load maps from gazebo and run gazebo server.
-
The robot urdf model.
xacro.pyfromxacropackage expands the macros from urdf model and sends the whole urdf xml to the parameter server. TheRobot, theControllerManager, and the gazebo plugin all need to load some parts of the urdf model.In pr2_description/urdf/pr2_upload.launch, <param name="robot_description" command="$(find xacro)/xacro.py '$(find pr2_description)/robots/pr2.urdf.xacro'" /> -
Spawn a robot in gazebo ros. Using the urdf uploaded to the param server, the gazebo simulator now can create a 3d robot model and run the ros controller manager, loading the controller manager, importing urdf descriptions of joints, transmissions and actuators, waiting for future update.
In pr2_no_controllers.launch, <node name="spawn_pr2_model" pkg="gazebo_ros" type="spawn_model" args="$(optenv ROBOT_INITIAL_POSE) -unpause -urdf -param robot_description -model pr2 -ros_namespace /gazebo" respawn="false" output="screen" /> -
**Set controller parameters. **
In pr2_controller_manager/controller_manager.launch, <!-- Controller manager parameters --> <param name="pr2_controller_manager/mechanism_statistics_publish_rate" value="1.0" /> <param name="pr2_controller_manager/joint_state_publish_rate" value="100.0" />
<!-- Robot state publisher --> <node pkg="robot_state_publisher" type="robot_state_publisher" name="robot_state_publisher"> <param name="publish_frequency" type="double" value="50.0" /> <param name="tf_prefix" type="string" value="" /> </node> -
Start other components, like
robot_pose_ekf,hokuyo_node(laser scanner),dualstereo camera,tf2buffer server, etc.Defined in
pr2_bringup.launch. -
Start pr2 controllers. Launch file is defined in
pr2_controller_configuration_gazebo/launch/pr2_default_controllers.launch.Load controllers parameters from yaml file, and using
spawnerscript to start them.
The Gazebo ROS Controller Manager works as a gazebo plugin.
- In initialization phase, it creates a
HardwareInterfaceinstacne and aControllerManagerinstance, loading the urdf model, placing actuators to the hardware interface, and initalize the controller manager to get all informations of joints, transmissions and actuators. - In simulation phase, the gazebo itself has a simulation clock (
/clocktopic, detail: Clock ); in every millisecond in simulation, gazebo updates the clock and runUpdateChild()function in the gazebo ros controller manager.- in gazebo plugin there is a fake joint state (or simulation state) to get/send joint states from/to the actuators.
- In each step, the plugin gets all joint position and velocity into the fake joint state, and then backward-propagate them to actuator position.
- Then the controller manager updates, reading actuator positions and returning actuator efforts.
- The plugin reverse the
jointEffort->actuatorEfforttransmission to **get joint efforts in fake joint states. ** - Use the joint efforts to add force / torque to corresponding joint in gazebo.