Link to the challenge
In this challenge we are given two files,
- a pcap dump of the traffic between the attacker and the server,
- the server's implementation
The server script shows us that the password exchanged between the client and the server is encrypted using
- a 16 byte AES key (that we do not know)
- an iv which changes at each exchange between client and server
And this is not a crypto challenge but a hardware one so we will probably have to do without deciphering the data.
Nevertheless as it is AES-CTR then the encrypted payload has the same size as original payload.
The verification script does the following steps (in the following order)
- it verifies the length of the key first
- it checks for forbidden characters (we don't really care about it)
- for each character of the password
- it hashes the character, and the character it must compare it to
- if hashes do not match it exits
This will probably lead to very different verification times depending on how many characters are correct and how many are not:
- if password length is incorrect then near immediate execution
- if one character is correct, we will have an execution time twice as long as when no character is correct...
We see that the server is sending packets in which the tcp payload varies between one and 12 bytes. The payload that is sent is encrypted (and as we saw before hand recovery of the AES key and iv is not feasible). Nevertheless as the dump is between two ports on the same host, timing will be very precise.
The first thing I did was plot the duration between
- a challenge is sent by the attacker
- the server's response
and how long the payload is.
This is the script :
import matplotlib.pyplot as plt
from scapy.all import TCP, rdpcap

packets = rdpcap('chrono-rage.pcap')

client_port = 55986
server_port = 5000

attempts = []
response_times = []
payload_sizes = []

last_request_time = None
last_payload_size = 0
attempt_counter = 0

for pkt in packets:
    if TCP in pkt and len(pkt[TCP].payload) > 0:

        if pkt[TCP].sport == client_port and pkt[TCP].dport == server_port:
            last_request_time = pkt.time
            last_payload_size = len(pkt[TCP].payload)
            attempt_counter += 1

        elif pkt[TCP].sport == server_port and pkt[TCP].dport == client_port:
            if last_request_time is not None:
                delta = float((pkt.time - last_request_time) * 1000)

                attempts.append(attempt_counter)
                response_times.append(delta)
                payload_sizes.append(last_payload_size)

                last_request_time = None
            else:
                print("Ooops might be having a problem...")

scatter = plt.scatter(attempts, response_times, c=payload_sizes, s=40)
plt.plot(attempts, response_times, linestyle='-', alpha=0.3, color='gray')

cbar = plt.colorbar(scatter)
cbar.set_label('TCP Payload Size (Bytes)')

plt.title('Timing Attack Visualization')
plt.xlabel('Attempt Number')
plt.ylabel('Server Response Time (ms)')

plt.show()
The result is as follows

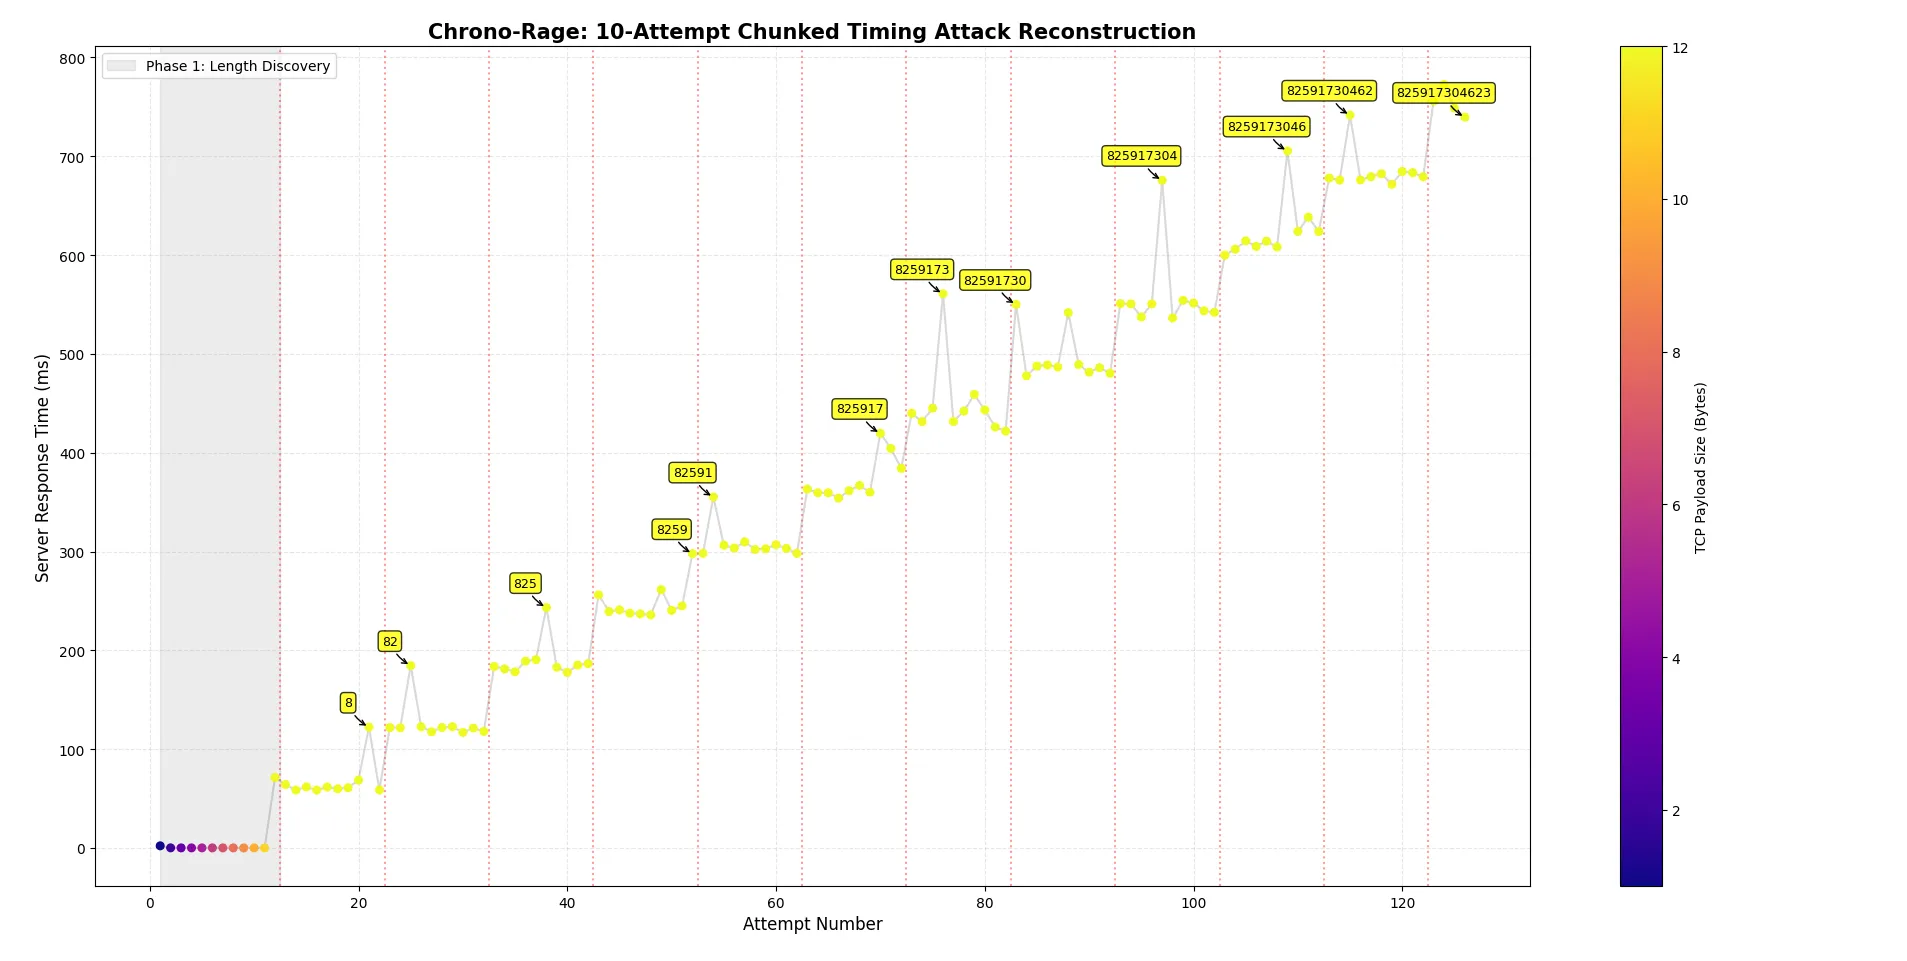
From here we can understand how the attacker proceeded
- First he determined the length of the password with the first 12 packets
- Then he tried all the possible values for the first character (between 0 and 9)
- He then took the character who triggered the longest response time from the server
- He continues searching for the next character
We can plot this in more detail, and see the progression of the attacker in this new graph
The script to recover the whole flag is :
from scapy.all import rdpcap, TCP
import matplotlib.pyplot as plt

packets = rdpcap('chrono-rage.pcap')

client_port = 55986
server_port = 5000

attempts = []
response_times = []
payload_sizes = []

last_request_time = None
last_payload_size = 0
attempt_counter = 0

for pkt in packets:
    if TCP in pkt and len(pkt[TCP].payload) > 0:
        if pkt[TCP].sport == client_port and pkt[TCP].dport == server_port:
            last_request_time = pkt.time
            last_payload_size = len(pkt[TCP].payload)
            attempt_counter += 1

        elif pkt[TCP].sport == server_port and pkt[TCP].dport == client_port:
            if last_request_time is not None:
                delta = float((pkt.time - last_request_time) * 1000)
                attempts.append(attempt_counter)
                response_times.append(delta)
                payload_sizes.append(last_payload_size)
                last_request_time = None

start_idx = 0
for i, t in enumerate(response_times):
    if t > 20:  # The server had to hash to get longer than 20ms
        start_idx = i+1
        break

print(f"PIN length: {payload_sizes[start_idx]}")

bf_times = response_times[start_idx:]
bf_attempts = attempts[start_idx:]

current_pin = ""
spike_x = []
spike_y = []
spike_labels = []

for i in range(0, len(bf_times), 10):
    chunk_times = bf_times[i:i+10]
    chunk_attempts = bf_attempts[i:i+10]

    digit_position = (i // 10) + 1

    if len(chunk_times) == 10:
        max_time = max(chunk_times)
        correct_digit = chunk_times.index(max_time) # The index (0-9) IS the guessed digit

        current_pin += str(correct_digit)

        spike_x.append(chunk_attempts[correct_digit])
        spike_y.append(max_time)
        spike_labels.append(current_pin)

        print(f"[-] Position {digit_position:02d}: Guessed '{correct_digit}' (Max time: {max_time:.1f} ms) -> PIN: {current_pin}")


    else: # If the chunk is less than 10, the attacker got an "OK" and found the correct PIN
        correct_digit = len(chunk_times) - 1
        current_pin += str(correct_digit)

        spike_x.append(chunk_attempts[-1])
        spike_y.append(chunk_times[-1])
        spike_labels.append(current_pin)

        print(f"[+] Position {digit_position:02d}: Guessed '{correct_digit}' -> PIN: {current_pin}")

print(f"[+] Final Extracted Flag: FCSC{{{current_pin}}}")

# Shade the Length Discovery phase
plt.axvspan(min(attempts), attempts[start_idx]-0.5, color='gray', alpha=0.15, label='Phase 1: Length Discovery')

# Draw vertical lines to separate the attacker's 10-attempt chunks
for i in range(start_idx, len(attempts), 10):
    plt.axvline(x=attempts[i]-0.5, color='red', linestyle=':', alpha=0.4)

# Scatter plot of all attempts
scatter = plt.scatter(attempts, response_times, c=payload_sizes, cmap='plasma', s=30, zorder=3)
plt.plot(attempts, response_times, linestyle='-', alpha=0.3, color='gray', zorder=2)
cbar = plt.colorbar(scatter)
cbar.set_label('TCP Payload Size (Bytes)')

# Annotate the chosen "max" spikes
for x, y, label in zip(spike_x, spike_y, spike_labels):
    plt.annotate(f"{label}",
                 (x, y),
                 textcoords="offset points",
                 xytext=(-15, 15),
                 ha='center',
                 fontsize=9,
                 bbox=dict(boxstyle="round,pad=0.3", fc="yellow", ec="black", lw=1, alpha=0.8),
                 arrowprops=dict(arrowstyle="->", connectionstyle="arc3,rad=0.2", color='black'))

plt.title('Chrono-Rage: 10-Attempt Chunked Timing Attack Reconstruction', fontsize=15, fontweight='bold')
plt.xlabel('Attempt Number', fontsize=12)
plt.ylabel('Server Response Time (ms)', fontsize=12)
plt.grid(True, linestyle='--', alpha=0.3, zorder=1)
plt.legend(loc='upper left')

plt.show()
And now we know the flag.